Labels

Showing posts with label Android. Show all posts

Why my android app is not working.? Why my android app crashes.?

Hello friends,

Here I am going to discuss what are the general and mistakes people do or they forget while making an android app.

Reason app do not open or crashes in between

1.Do not include permission in Android.manifest

2.Do not add activity in Android.manifest

3.xml file id to element is not mapped or connect to UI

4.Calling of a function that goes into a loop

5.Calling of a function directly in onCreate()

6.Xml file is not connected

There are many others error due to minor mistakes.

Try to avoid all these silly mistakes.

How to make caluculator app using android.?

activity_main.xml

 <?xml version="1.0" encoding="utf-8"?>  
 <android.support.constraint.ConstraintLayout  
   xmlns:android="http://schemas.android.com/apk/res/android" android:layout_width="match_parent"  
   android:layout_height="match_parent">  
   <LinearLayout  
     android:layout_width="match_parent"  
     android:layout_height="match_parent"  
     android:orientation="vertical" >  
     <LinearLayout  
       android:layout_width="match_parent"  
       android:layout_height="wrap_content" >  
       <TextView  
         android:id="@+id/textView1"  
         android:layout_width="wrap_content"  
         android:layout_height="wrap_content"  
         android:text="Value 1"  
         android:textAppearance="?android:attr/textAppearanceLarge" />  
       <EditText  
         android:id="@+id/editText1"  
         android:layout_width="wrap_content"  
         android:layout_height="wrap_content"  
         android:layout_weight="1"  
         android:ems="10"  
         android:inputType="number" >  
         <requestFocus />  
       </EditText>  
     </LinearLayout>  
     <LinearLayout  
       android:layout_width="match_parent"  
       android:layout_height="wrap_content" >  
       <TextView  
         android:id="@+id/textView2"  
         android:layout_width="wrap_content"  
         android:layout_height="wrap_content"  
         android:text="Value2"  
         android:textAppearance="?android:attr/textAppearanceLarge" />  
       <EditText  
         android:id="@+id/editText2"  
         android:layout_width="wrap_content"  
         android:layout_height="wrap_content"  
         android:layout_weight="1"  
         android:ems="10"  
         android:inputType="number" />  
     </LinearLayout>  
     <LinearLayout  
       android:layout_width="match_parent"  
       android:layout_height="wrap_content" >  
       <Button  
         android:id="@+id/button1"  
         android:layout_width="wrap_content"  
         android:layout_height="wrap_content"  
         android:text="+" />  
       <Button  
         android:id="@+id/button2"  
         android:layout_width="wrap_content"  
         android:layout_height="wrap_content"  
         android:text="-" />  
       <Button  
         android:id="@+id/button3"  
         android:layout_width="wrap_content"  
         android:layout_height="wrap_content"  
         android:text="*" />  
       <Button  
         android:id="@+id/button4"  
         android:layout_width="wrap_content"  
         android:layout_height="wrap_content"  
         android:text="/" />  
       <Button  
         android:id="@+id/button5"  
         android:layout_width="wrap_content"  
         android:layout_height="wrap_content"  
         android:text="C" />  
     </LinearLayout>  
     <LinearLayout  
       android:layout_width="match_parent"  
       android:layout_height="wrap_content" >  
       <TextView  
         android:id="@+id/textView3"  
         android:layout_width="wrap_content"  
         android:layout_height="wrap_content"  
         android:text="Result"  
         android:textAppearance="?android:attr/textAppearanceLarge" />  
       <EditText  
         android:id="@+id/editText3"  
         android:layout_width="wrap_content"  
         android:layout_height="wrap_content"  
         android:layout_weight="1"  
         android:ems="10"  
         android:inputType="number" />  
     </LinearLayout>  
   </LinearLayout>  
 </android.support.constraint.ConstraintLayout>  

MainActivity.java

 package com.app.kapil.calculator;  
 import android.os.Bundle;  
 import android.support.v7.app.AppCompatActivity;  
 import android.view.View;  
 import android.widget.Button;  
 import android.widget.EditText;  
 public class MainActivity extends AppCompatActivity {  
   Button b1,b2,b3,b4,b5;  
   EditText t1,t2,t3;  
   @Override  
   protected void onCreate(Bundle savedInstanceState) {  
     super.onCreate(savedInstanceState);  
     setContentView(R.layout.activity_main);  
     b1=(Button) findViewById(R.id.button1);  
     b2=(Button) findViewById(R.id.button2);  
     b3=(Button) findViewById(R.id.button3);  
     b4=(Button) findViewById(R.id.button4);  
     b5=(Button) findViewById(R.id.button5);  
     t1=(EditText) findViewById(R.id.editText1);  
     t2=(EditText) findViewById(R.id.editText2);  
     t3=(EditText) findViewById(R.id.editText3);  
     b1.setOnClickListener(new A());  
     b2.setOnClickListener(new B());  
     b3.setOnClickListener(new C());  
     b4.setOnClickListener(new D());  
     b5.setOnClickListener(new E());  
   }  
   class A implements View.OnClickListener  
   {  
     @Override  
     public void onClick(View arg0) {  
       int a,b,ans;  
       a=Integer.parseInt(t1.getText().toString());  
       b=Integer.parseInt(t2.getText().toString());  
       ans=a+b;  
       t3.setText(""+ans);  
     }  
   }  
   class B implements View.OnClickListener  
   {  
     @Override  
     public void onClick(View arg0) {  
       int a,b,ans;  
       a=Integer.parseInt(t1.getText().toString());  
       b=Integer.parseInt(t2.getText().toString());  
       ans=a-b;  
       t3.setText(""+ans);  
     }  
   }  
   class C implements View.OnClickListener  
   {  
     @Override  
     public void onClick(View arg0) {  
       int a,b,ans;  
       a=Integer.parseInt(t1.getText().toString());  
       b=Integer.parseInt(t2.getText().toString());  
       ans=a*b;  
       t3.setText(""+ans);  
     }  
   }  
   class D implements View.OnClickListener  
   {  
     @Override  
     public void onClick(View arg0) {  
                try{  
                int a,b,ans;  
       a=Integer.parseInt(t1.getText().toString());  
       b=Integer.parseInt(t2.getText().toString());  
                ans=a/b;  
       t3.setText(""+ans);  
                }  
                catch(Exception e){  
        Toast.makeText(MainActivity.this,"Enter a number other than 0 "+e,Toast.LENGTH_LONG).show();  
                }  
     }  
   }  
   class E implements View.OnClickListener  
   {  
     @Override  
     public void onClick(View arg0) {  
       t1.setText("");  
       t2.setText("");  
       t3.setText("");  
       t1.requestFocus();  
     }  
   }  
 }  

Output


I hope that helps :)

-Kapil Arora-

How to setup android studio.? How to install android studio.? Error in installing android studio.? Windows/Linux/MacOs

Hello friends,

The problem in installing an android studio is very common to all as it's huge setup includes everything in it required to build awesome apps.

Don't worry if it doe not installed in first go we will soon start in your pc and we will look into the issue and fix it.

Basically, you need two things to run the android studio.
  1. Java environment (JDK installed) Download Java
  2. Latest Android Studio(3.2 at this time) Download Android Studio
If you have already downloaded java and installed in your pc then you need to check which java version is installed on  your pc.

How to check which java version is installed.? 
 
For Windows/Linux 
  • Open cmd/terminal
  •  For Windows press window key+R and type cmd and run it.
  • For Linux, search terminal run it 

In both, you can use this command to know your java version installed javac -version

Below is the sample output in windows


For MacOs

Find Java Control Panel on Mac
Launch the Java Control Panel on Mac (10.7.3 and above)
  1. Click on Apple icon on upper left of the screen.
  2. Go to System Preferences
  3. Click on the Java icon to access the Java Control Panel.
 To know in more details for macos click here


Now, we are done with installation of java or checking of java version lets's come back to android studio installation.

It's recommended that you need to connect to wifi or a good internet connection with your system so if any file missing or any updation require it fixes it while installation only.

If you got "Hello World " on the screen in the first go then many congratulations to you as you have successfully running android studio and ready to go.

If there is some errors or red lines on the files don't worry there might be some updation require or SDK file location missing you just connect your system to the internet and start android studio again.
 
And in somecases it might not pick the sdk location automatically and you need to set the SDK path in case it could not pick the path for SDK.

How to set SDK path or How to find SDK location.?  

Your SDK location will be in

 Windows:- C:/user/<your system name>/AppData/Local/Android
Linux:- /home/AccountName/Android/Sdk
Mac:- /Library/Android/Sdk
  •  Ctrl+Alt+S 
  •  File->Setting  
  • Tools->Sdk Manager


I hope that help and worked  :)

-Kapil Arora-


What is Error of R in android

Hello friend,

This error is because you have something in your java file or xml file whose Resources are not found in the project.

And then

You can Build->Rebuild Project that might help.

How to deploay project to firebase from my pc..? How to host project to firebase using command line from my pc.?


Hello friends, 

It sounds like very tough that how to host project from pc using command like. But in real it's just two step process.

Note:- Command line for windows and are cmd and terminal respectively.

 Before moving ahead you must have installed NodeJS in your pc Download NodeJS. 

If you have done that then use command node -v  in cmd it will you version like v1.0.90.
If you got this that great you are ready to go ahead. 

  •  Step1
    • Login to firebase console
    • Create a project  
  • Step 2
    • Open your project folder in your pc
    • Type cmd in top bar (www->kapilonline->cmd) and enter
    •  You will see a black screen command line interface is prompt
  •  Step 3
    • Use command firebase login
    • Use command firebase deploy


 Bingo!!!! You deployed your project to firebase. 
If  still problem there something missing and not working out for you comment below

How to use firebase for website.? How to use firebase for android.? How to insert data in firebase.?

Hello friends,

The time I am typing this post just 5 min. before I have resolved this or understood this.

So, As you are new to firebase or beginner then you need to know some of basic things.

1.Firebase is not SQL database
2.There is no query to insert data in firebase.
3.Firebase store data in tree structure there are nodes and child nodes.

Steps to follow for easy start
1.Login Firebase
2.Click Go to console
3.Create new project
4.Give any name to project
5.Click setting icon on right of Project overview
6.Choose IOS or ANDROID or Website for which you are using firebase

For website you need to include following sample details in website head section
Note:- your-project-name is here to show you sample details
<head>
<script>
var config = {
    apiKey: "AIzaSyC5V6O48uU3wM2A1eeHzVKW_IfZWrO7X3s",
    authDomain: "your-project-name.firebaseapp.com",
    databaseURL: "https://your-project-name.firebaseio.com",
    projectId: "your-project-name",
    storageBucket: "your-project-name.appspot.com", 
    messagingSenderId: "3186427xxxx"
  };
  firebase.initializeApp(config); 

</script>
</head> 

---------------------------------------------------------------------------

For Android App
Following these steps

Note:-If you are in upgraded version of Android studio then click on "Tools->Firebase->Login->Connect to firebase".


 OR

If  above method does not work for you login firebase in browser and under Console select project
1.Goto project setting 
2.Select android 
3.Copy package name from android project app and paste it to register app
4.Download google-service JSON File 
5.Paste that file under app folder in project folder of your project.


Note:-Now Click on Add Realtime database to your android project to connect your database to your project.


Coming to database and storage

1.Database where information is saved like name email phone etc.

2.Storage where image,pdf,file etc. is stored.

Data will not inserted untill you make following changes

1.Change database cloud beta to real database


2.Under rule section change read and write to true.


Want to know how to host website on firebase for free from your desktop.?
Comment below

Check Armstrong No B/W any Range 1 to100000

//code
#include<stdio.h>
#include<iostream>
#include<math.h>
using namespace std;
main()
{
int num,rem,j=1,k=1,count=0,sum=0;
printf("Enter no\n");
scanf("%d",&num);
int copy=num;
while(num>0)
{
num=num/10;
count=count+1;
}
num=copy;
for(int i=0;i<count;i++)
{
rem=num%10;
while(j<=count)
{
k=k*rem;
j++;
}
//Instead of loop i can directly use pow(); function to get power
//k=pow(rem,count);
sum=sum+k;
j=1;
k=1;
num=num/10;
}
if(sum==copy)
{
printf("Armstrong no\n");
}
else
{
printf("Not an armstrong no\n");
}
}

Find Armstrong No B/W 1 to 1000000

//code

#include<iostream>
#include<math.h>
using namespace std;
main()
{
int sum,k,r,i,count=0;
for(i=1;i<100000;i++)
{
count=0;
k=i;
int num=i;
sum=0;
while(num>0)
{
num=num/10;
count=count+1;
}
while(k>0)
{
r=k%10;
//if count is 3 then it is r power 3 by using pow function
//if count is 4 then it is r power 4
sum=sum+pow(r,count);
k=k/10;
}
if(sum==i)
{
printf("Armstrong no=%d\n",i);
}
}
}

Heap Sort

// C++ program for implementation of Heap Sort
#include <iostream>
using namespace std;

// To heapify a subtree rooted with node i which is
// an index in arr[]. n is size of heap
void heapify(int arr[], int n, int i)
{

    int largest = i;  // Initialize largest as root
    int l = 2*i + 1;  // left = 2*i + 1
    int r = 2*i + 2;  // right = 2*i + 2

    // If left child is larger than root
    if (l < n && arr[l] > arr[largest])
        largest = l;
       
    // If right child is larger than largest so far
    if (r < n && arr[r] > arr[largest])
        largest = r;

    // If largest is not root
    if (largest!=i)
    {
   
    swap(arr[i], arr[largest]);
    //which ever is large left or right from ROOT will be swap by ROOT
    //a[i] is root,a[largest] is left or right node value.
   

        // Recursively heapify the affected sub-tree
        heapify(arr, n, largest);
    }
}

// main function to build max heap
void heapSort(int arr[], int n)
{
    // Build heap (rearrange array)
    for (int i = n/2-1; i >= 0; i--)
    {
        heapify(arr, n, i);
       
    }
   

    // One by one extract an element from heap
    for(int k=n-1;k>=0;k--)
    {
        // Move Root  Node to end
        swap(arr[0], arr[k]);
        // call max heapify on the reduced heap
        heapify(arr, k, 0);
    }
}

/* A utility function to print array of size n */
void printArray(int arr[], int n)
{
    for (int i=0; i<n; ++i)
        cout << arr[i] << " ";
    cout << "\n";
}

// Driver program
int main()
{
    int arr[] = {50,75,60,35,45,25,95};
    int n = sizeof(arr)/sizeof(arr[0]); 
    heapSort(arr, n);

    cout << "Sorted array is \n";
    printArray(arr, n);
}

Selection Sort

//Code

#include<iostream>
#include<stdlib.h>
#include<stdio.h>
using namespace std;
void selectionSort(int *p,int n)
{
int min_index;
for(int i=0;i<n-1;i++)
//last value ke liye loop nh chalana hai kyuki vo end mai 
//correct position pai aa jaegi
{  min_index=i;
for(int j=i+1;j<n;j++)
//har value ko baki n-1 values se comapre krega.
{
if(p[j]<p[min_index])
{
swap(p[min_index],p[j]);
}


}
}
}
main()
{

int a[]={5,4,7,8,2,1,9,10,6,3};
int n=sizeof(a)/sizeof(a[0]);
selectionSort(a,n);
printf("Sorted Array\n");
for(int i=0;i<n;i++)
{
printf("%d ",a[i]);
}

}
--------------------------------------------------------------------------------------------------------------------------
/*Alternatively you can use this method for user input

#include<iostream>
#include<stdlib.h>
#include<stdio.h>
using namespace std;
void selectionSort(int *p,int n)
{
int min_index;
for(int i=0;i<n-1;i++)
//last value ke liye loop nh chalana hai kyuki vo end mai 
//correct position pai aa jaegi
{  min_index=i;
for(int j=i+1;j<n;j++)
//har value ko baki n-1 values se comapre krega.
{
if(p[j]<p[min_index])
{
swap(p[min_index],p[j]);
}


}
}
}
main()
{
int n;
   printf("Enter Size of Array\n");
   scanf("%d",&n);
   printf("Enter the %d elements of array\n",n);
int *arr;
arr=(int*)malloc(100*sizeof(int));
//we can use either calloc or malloc.Syntax of calloc is
//arr=(int*)calloc(n,sizeof(int)); here you save the memory
for(int i=0;i<n;i++)
{
scanf("%d",&arr[i]);
}
selectionSort(arr,n);
printf("Sorted Array\n");
for(int i=0;i<n;i++)
{
printf("%d ",arr[i]);
}


}*/

How to Print Special Kite Pattern In C

Click On Image To ZOOM
//Code

#include<stdio.h>
main()
{
 int i,j,k,n;

 for(i=0;i<4;i++)
 {
  for(j=0;j<3-i;j++)
  {
   printf(" ");
  }
  for(k=0;k<2*i+1;k++)
  {
   printf("*");
  }
  printf("\n");
 }
 for(i=0;i<3;i++)
 {
  for(j=0;j<i+1;j++)
  {
  printf(" ");
  }
  for(k=0;k<5-2*i;k++)
  {
  printf("*");
  }
  printf("\n"); 
 }
 for(i=1;i<2;i++)
 {
  for(j=0;j<i+1;j++)
  {
  printf(" ");
  }
  for(k=0;k<2*i+1;k++)
  {
  printf("*");
  }
  printf("\n");
 }

}

Star Pattern2

Click On Image To ZOOM
//Code

#include<stdio.h>
main()
{
int i,j,k,n;
printf("Enter no of lines\n");
scanf("%d",&n);
for(i=0;i<n;i++)
{
for(j=n;j-i>0;j--)
{
printf(" ");
}
for(k=0;k<=i;k++)
{
printf("* ");
}
printf("\n");
}
}

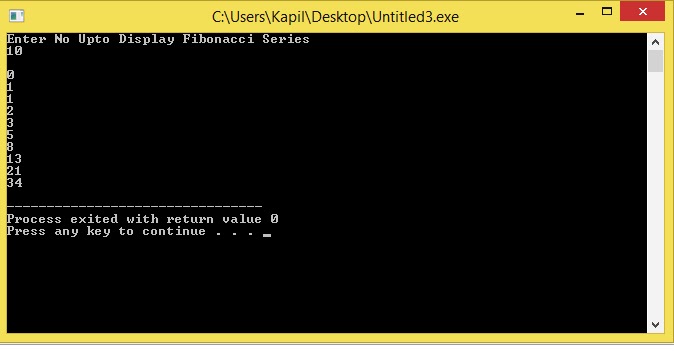
How to Print Fibonacci Series In C

Click Image To ZOOM

//Code
#include<stdio.h>
main()
{
int a,b,c,i,n;
a=0;b=1;
printf("Enter No Upto Display Fibonacci Series\n");
scanf("%d",&n);
printf("\n%d\n%d\n",a,b);
for(i=0;i<n-2;i++)
{
c=a+b;
a=b;   /*after a=0,b=1,we have sum c=1,now to add b&c for series in loop
       just change b to a and c to b*/
    b=c;
    
printf("%d\n",c);
}

}

Star Pattern3

Click On Image To ZOOM
//Code

#include<stdio.h>
main()
{
int i,j,k,n;
printf("Enter no of lines\n");
scanf("%d",&n);
for(i=0;i<n;i++)
{
for(j=0;j<n-1-i;j--)
{
printf(" ");
}
for(k=0;k<2*i+1;k++)
{
printf("*");
}
printf("\n");
}
}

Star Pattern1

Click On Image To ZOOM


//Code
#include<stdio.h>
main()
{
int i,j,n;
printf("Enter no of lines\n");
scanf("%d",&n);
for(i=0;i<n;i++)
{
for(j=0;j<=i;j++)
{
printf("*");
}
printf("\n");
}
}


Find Armstrong Number Between 1-500 Program in C

//Code

#include<stdio.h>
main()
{
int sum,k,r,i;
for(i=1;i<=500;i++)
{
k=i;
sum=0;
while(k>0)
{
r=k%10;
sum=sum+r*r*r;
k=k/10;

}
if(sum==i)
{
printf("Armstron No = %d\n",i);
   }

}

}

Program in C To Check Armstrong no

//Code

#include<stdio.h>
main()
{
int n,sum=0,k,r;
printf("Enter No To Check\nArmstrong Number OR Not\n");
scanf("%d",&n);
k=n;
while(n>0)
{
r=n%10;
sum=r*r*r+sum;
n=n/10;
}
if(k==sum)
printf("%d is an Armstrong no\n",sum);
else
printf("NOT an Armstrong no");

}

How to Calculate SUM Digits Of a Number

//code

#include<stdio.h>
main()
{
int n,sum=0;
printf("Enter no \n");
scanf("%d",&n);
while(n>0)
{
sum=sum+n%10;
n=n/10;
}
printf("Sum of no is=%d\n",sum);

}

How To Print Reverse Of A Number In C

//Code

#include<stdio.h>
main()
{
int n,rev=0;
printf("Enter no to reverse\n");
scanf("%d",&n);
while(n>0)
{
rev=rev*10+n%10;
n=n/10;
}
printf("Reverse of no is=%d\n",rev);
}

SWAP Two No Code

//Swap Two No.

#include<stdio.h>
main()
{
 int a,b,c;
 printf("enter the value of a,b,c");
 scanf("%d%d",&a,&b);
 c=a;
 a=b;
 b=c;
 printf("%d%d",a,b);
}